Cabinet Refinishing

How Long Does Cabinet Refinishing Take?

San Jose Cabinet Refinishing

San Jose Cabinet Refinishing is a great way to give your kitchen a fresh new look without undergoing an extensive renovation. However, homeowners often wonder how long the project will take.

Understanding realistic timelines prevents frustration and allows you to coordinate household activities around the work schedule. This cabinet refinishing guide provides detailed information about what factors extend or shorten painting timeframes and how to prepare for the duration of your cabinet refinishing project.

Installation

Cabinet refacing updates your kitchen with new doors and drawer fronts without replacing the cabinet boxes. It offers a more customized visual transformation, but it does require more labor-intensive prep work like stripping and sanding. During this phase, Redo Cabinets will also repair any damage to the cabinet boxes and apply a fresh coat of stain or paint.

The refacing process typically takes a couple of days to complete. The team will remove all the hardware and doors, clean and prep the cabinets for painting, and prepare a safe workspace to work on. Then, they’ll carefully reattach the doors and hardware, following the labels they created during disassembly. Lastly, they’ll inspect the final result for any imperfections and provide a leave-behind maintenance kit with instructions and tools to care for your cabinets.

Material Availability

A key element that can impact the refacing process is the availability of the chosen materials. This may occur due to shipping or production delays, which can affect project timelines. In this case, it’s important to partner with a company that is able to meet your needs and deliver quality results.

Depending on the type of finish you’re going for, drying and curing times can also impact the overall project duration. Fast-drying paints can reduce wait times, but high-quality finishes need time to fully cure for best results.

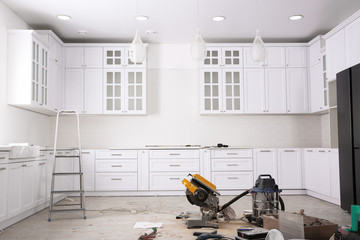
Removing the doors and drawer fronts for refinishing is a messy job, so it’s important to clear a safe work area and protect your belongings from dust and debris. It’s also important to score the tops and bottoms of the hinge hardware with a box cutter, which will make it easier to align the hinges when reattaching them.

The preparation phase can take 2-4 hours, which includes cleaning and sanding the cabinets to ensure they’re ready for painting. Once the cabinets are prepared, the first coat of primer can take 2-4 hours to apply, and it will need at least 24 hours to dry. Then, the second coat can be applied in the same way and will need another 24 hours to dry.

Preparation

Cabinet refinishing gives you the opportunity to create a unique style that matches your preferences, while preserving the integrity of existing cabinetry. This popular home upgrade is cost-effective and doesn’t require the weeks of construction associated with a complete cabinet replacement project. However, knowing how long refinishing takes at each phase is essential to avoid frustration and plan household activities around project completion. Our comprehensive timeline guide reveals what factors extend or shorten refinishing duration, as well as practical strategies for living comfortably while work progresses.

Cabinet refacing involves the application of new materials to existing cabinet frames and doors, adding new hardware, and possibly including decorative features like molding or trim. This upgrade is ideal for homeowners looking to update their kitchen’s appearance, increase home value, or add functional upgrades like soft-close hinges and sleek contemporary hardware. However, it’s not a solution for every situation. If you’re looking to address more serious damage, or your cabinets aren’t structurally sound, a full replacement may be required.

The preparation phase is a physically demanding yet critically important part of the cabinet refinishing process. Professionals remove cabinet doors and drawer fronts, labeling each piece for proper reinstallation. They also prepare surfaces for painting, removing years of grease and cooking residue that interfere with paint adhesion. Then, they sand, prime, and apply multiple coats, allowing sufficient drying time between each step.

This is a very detailed and labor-intensive process, and the results depend on the quality of products used. For example, low-quality paints and stains are more likely to chip or peel, even with careful application. Meanwhile, high-quality finishes offer better durability, even when subjected to heavy use.

During this stage, you’ll experience limited access to your kitchen while the Redo Cabinets team works. The best way to mitigate inconvenience is to clear out the work area ahead of time and protect countertops, appliances, and flooring. You can still cook, wash dishes, and store groceries in your pantry, but you’ll need to dine out or prepare meals elsewhere until the refinishing process is complete. This phase typically takes 2-4 days, plus additional time for drying.

Staining

Cabinet refinishing and refacing are transformative ways to breathe new life into your kitchen without the expense of a full renovation. Both processes require a blend of expertise, precision, and time management to produce high-quality results that minimize disruptions to your home’s daily routine. The timelines for these projects are influenced by a variety of factors, including cabinet size, stain color and finish, and the number of coats that must be applied. A professional can save you time by understanding these influencing factors and managing your expectations accordingly.

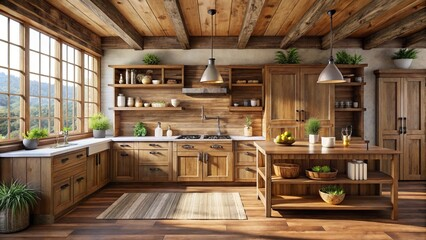
Before any staining begins, the existing cabinets and drawer fronts must be removed and labeled. This is typically done by the homeowner, but can also be completed by a cabinet refacing professional. Depending on the extent of prep needed for your specific project, this can take anywhere from two days for small kitchens to as long as a week for a more detailed job with older wood or a more extensive staining process.

Once the cabinet doors and drawer fronts are removed, a thorough inspection of the wood is conducted to ensure it will accept stain properly. The existing finishes are then stripped and sanded to smooth out the surfaces and ensure a clean, even stain. This is typically a multi-day process that requires several days for each coat of stain to fully dry and cure.

Depending on your desired final color and finish, the cabinets can then be stained as many times as needed until the perfect look is achieved. Once the cabinet staining is complete, the hardware and hinges are reinstalled and any touch-ups to the paint or stain are completed. Professional cabinet refinishers know how to manage timing based on temperature and humidity, so all coats are allowed to fully dry before the next layer is applied. Once the final touches are complete, everything is reassembled and the kitchen is ready for use!

Painting

Cabinet refinishing is less invasive than a full cabinet replacement project, which requires gutting your kitchen and turning it into a construction zone for weeks. A professional cabinet refinishing team can typically finish the job in just a few days, saving you a lot of time and stress.

The cabinet refinishing process requires extensive cleaning and sanding to prepare the surface for painting. This is essential for ensuring your new coat of paint adheres properly, and it can take up to 4-6 hours. It’s a critical step that’s often overlooked, but it’s key to lasting results.

Once the surface has been thoroughly cleaned, the primer is applied and dries for up to 24 hours. Depending on the color and coverage situation, you may need two or more coats of paint to get even, durable results. The first coat of paint may take up to 2-4 hours to apply, and you’ll need another 24-hour drying period before applying the second coat.

If you choose to add a protective topcoat, this will take up to 24 hours to dry. This additional layer helps to ensure your cabinets can withstand years of holiday feasts, weekday chaos, and everyday wear and tear. If you skip this step, your cabinet finishes may show signs of damage sooner than they would with a durable clear polyurethane or conversion varnish topcoat.

After the final touch-ups are complete, your cabinet doors and drawers will be reassembled and your project is complete! This usually takes a few hours, but can also take up to a day if there are a lot of doors or drawers. Once the cabinets are back in place, your professional will inspect them and make any necessary touch-ups.

Choosing to refinish your cabinets is an eco-friendly option that keeps your existing wood out of landfills and gives you the freedom to completely transform your kitchen’s look, if desired. However, refinishing isn’t an effective solution for cabinets that are damaged or structurally unsound. If you’re considering a major cabinet renovation, it’s worth discussing your options with a professional before getting started.

General Contractors

Kitchen Remodeling Timeline – How Long Does Each Phase Take?

J&R Construction

If you’re considering a kitchen remodel, it’s important to understand the process and timeline. Whether you’re doing a complete renovation or a minor upgrade, the right plan makes all the difference.

Careful planning at this stage prevents costly delays down the road. For example, countertop templating can’t begin until the cabinets are installed, and electrical work cannot take place until flooring is finished. Contact J&R Construction for more details.

Cabinet Installation

The cabinet installation process is a critical kitchen remodeling timeline phase. Depending on your kitchen remodel scope, this step could take up to a week or more. This is why it’s important to plan out your project with a kitchen designer, especially if you’re adding or removing walls. This allows you to turn your dream into a realistic plan with goals that are both attainable and measurable.

Before beginning cabinet installation, your installers will check the walls for level surfaces and mark high or low spots that may need shimming. They’ll also note utility locations to make sure that cabinets don’t interfere with water, gas, and electrical lines. This prep work typically adds a day or two to the cabinet installation timeline.

Once the kitchen cabinet installation is complete, it’s time for countertop and backsplash installation. Countertops are usually made to order, and they require a longer turnaround time than stock countertops. Then, your plumbing and electricity will be hooked up. Once all of the appliances are connected, you can finish up any trim or paint touch-ups.

This kitchen remodeling timeline stage is a bit trickier to pin down, but it’s important to factor in the amount of time your contractor will spend ordering and waiting for materials and fixtures. Some products, like a new sink or stove, may be back-ordered for weeks, and that can throw off your entire project. To prevent delays, it’s best to set up a clear communication system with your contractors and to be available to answer questions quickly.

If you’re looking for a more streamlined cabinet installation process, consider having your cabinets refaced rather than replaced. This option can save you a significant amount of money while still providing a fresh new look. For a similar effect, you can also install a new backsplash and counters with a much shorter timeline. This is a great option if you’re on a tight budget but want to give your kitchen a quick update.

Countertop Installation

One of the most significant changes a homeowner can make to their kitchen is resurfacing the countertops. This is a critical step that can make the difference between an outdated, boring room and a functional space for cooking, dining, and gathering with family and friends.

However, countertop installation can be delayed by factors like weather and material availability. It’s important to discuss material selection and delivery timelines with your kitchen designer during the planning process, so you can anticipate any potential hiccups that could throw off your project schedule.

During the countertop installation process, your contractor will remove and install the new worktops, and connect the sink and faucet. They’ll also seal the seams and make any necessary adjustments to ensure a seamless, beautiful final result. This is a great time to consider adding a backsplash, which adds another layer of style to your kitchen.

Countertop installation takes longer than some homeowners might expect, especially if they’re working with a more dense material like granite or quartz. First, a fabricator must accurately measure your existing countertops, then create a template for the new ones based on those measurements. This can take up to a day or more depending on your kitchen size and the complexity of the countertops you’re installing.

If you’re doing a full kitchen remodel, this is the time to do any structural upgrades or electrical work that may be required. This might include rerouting plumbing or reinforcing walls to accommodate new fixtures and appliances. This is also the time to update your electrical panel and wiring if needed, which can be a lengthy process in older homes.

Once the cabinets and countertops are installed, your contractor will add finishing touches like cabinet hardware and crown molding, do touch-up paint jobs where needed, and level all appliances. They’ll also install a backsplash if you’ve chosen to include one, and complete any other details like resealing the seams in the counters. Then, you’ll be ready to enjoy your brand-new kitchen!

Flooring Installation

The flooring installation phase can make or break your kitchen remodel timeline. It’s one of the most important decisions you can make and it will impact your budget, design and overall kitchen remodel timeline. It’s recommended that you take some time to visit flooring showrooms and order samples so you have plenty of options before making a decision. It’s also wise to schedule your flooring installation during a slow season when backlogs are less likely and your installer may be able to get started sooner.

This stage is usually longer than you might expect because materials like cabinets, counters and flooring need to be ordered and delivered before they can be installed. This can add up to a few weeks or even a few months depending on the products you choose and current lead times. If you’re working with a custom cabinetry company or ordering stone, tile or hardwood floors, lead times can be significantly longer.

Intricate patterns and custom designs can significantly increase installation time as well. Lastly, subfloor preparation can add days or even weeks to the process if it’s required before installation.

Once cabinets and countertops are installed, appliances can be connected, plumbing and electrical fixtures can be reconnected, and lighting can be added. It is important to have a good line of communication with your designer at this point to ensure all questions are answered and any changes can be made before moving forward. This is because changing your mind mid-remodel can throw off the entire schedule and cause costly delays that you might not have been expecting.

This final stage may seem chaotic, but it’s actually a carefully-orchestrated dance of plumbing, mechanical, electrical, duct, and insulation work, along with drywall, tile, painting and carpentry. Many things must happen in sequence (countertop templating can’t be done until cabinets are installed, for example) and it’s critical that all team members stay on the same page to avoid miscommunication and unnecessary delay.

Appliance Installation

A kitchen remodel takes time, especially if it’s a complete gut renovation. However, if you know the steps in advance and are realistic about your expectations, you can avoid delays that throw off the entire project.

The first step of a kitchen remodeling project is to evaluate the space and design an ideal kitchen layout. The design phase includes detailed planning to ensure every element supports your functional goals. This step may take a couple weeks to several months to finalize your plans and receive quotations for materials. If you’re planning to hire a general contractor, be sure to set aside ample time for interviews and quotes. Qualified contractors are often booked months in advance.

Rough construction is the next step in a kitchen renovation. This process includes demolition and building out structural features, such as framing. This typically takes one week or less, but can be longer for a complete kitchen gut remodel. This is also the time to make any electrical or plumbing changes. It’s essential to ensure gas and water lines are turned off and inspected by professionals before starting any work.

Cabinet installation is the largest part of this step. Depending on the style you choose and the number of cabinets, this could take up to a month or more. This is also the time to install new countertops and backsplashes. Be mindful of moving appliances so they don’t ding or scratch your new surfaces.

Once your cabinets are installed and the countertop is fabricated, you’ll be ready to move in. If you’re installing a back splash, this should be done at the same time as your countertops. This step is also when you can install lighting, plumbing fixtures and other finishes. Be sure to use caution when moving heavy appliances so they don’t ding your new countertops.

The last step is a thorough walkthrough to verify everything meets your expectations and is ready for use. This is your opportunity to catch any missed details or areas that need a little extra attention. Be sure to have any questions answered by your designer or contractor quickly to keep the project on track and avoid delays.